Wednesday, December 5, 2012

Teamcenter Express - Version 9.1


Teamcenter Express Version 9.1

Teamcenter Express Version 9.1 uses the latest developments in Teamcenter and provides greater compatibility with Teamcenter, which simplifies installation, maintenance and support.
Teamcenter Express Version 9.1 offers several enhancements that allow you to search for data and performing everyday work more productive, as well as further improvements to the comprehensive multi-CAD capabilities with updated CAD integration.
These enhancements Teamcenter Express consolidates its position as the market leader in offering pre-configured cPDM environment for manufacturing companies, and convinces with its easy implementation and fast Rendering.
Advantages and new features:
Quickly find and retrieve data
The rapid location and retrieval of design data is a key driver of manufacturing companies.Teamcenter Express Version 9.1 provides significant improvements in this area, which simplify the search process and speed up the retrieval of the correct data.
  • The local search function in the Explorer pane filters the data displayed during the search term is entered. This way, you get immediate and dynamic feedback on the data corresponding to your search criteria. 
  • A new Quick Find tab in the data area simplifies the creation and execution of simple and complex queries. Some search functions that are carried out based on Boolean logic and previously could only be defined by a system administrator can now be configured directly by the users.

Updated Multi-CAD Capabilities

Teamcenter Express users can use the enhanced Teamcenter integration for Solid Edge, NX, SolidWorks, CATIA V5, Pro / E, AutoCAD and Autodesk Inventor. These enhancements include:
  • For Solid Edge users the integration between Solid Edge and Teamcenter (the Solid Edge Embedded Client or SEEC) for versions Solid Edge ST5 and Teamcenter Express Version 9.1 has been updated. Enhancements include a closer integration in areas such as automated assignment of property, and revision numbers and use of display names. Also performance improvements for loading bulk data and product structure management are included in this release. 
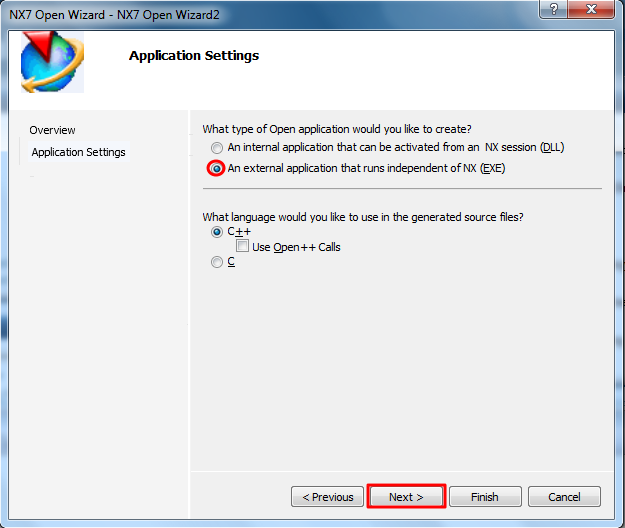
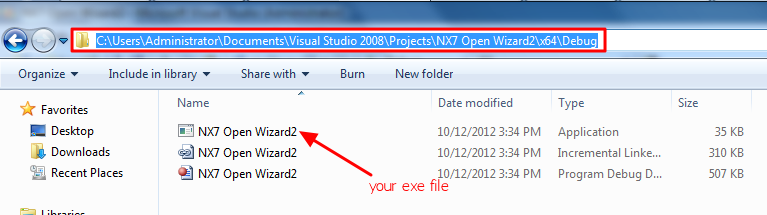
  • For NX users can check the results "Checkmate" is now stored in Teamcenter Express. The results can be retrieved, displayed and linked to workflows in Teamcenter Express without requiring NX parts and assemblies need to be opened.

Improved installation and maintenance

The quick installation of a pre-configured environment and ease of configuration according to customer requirements have been one of the central aspects of Teamcenter Express. Version 9.1 continues this direction by providing improved tools for installation and maintenance.
  • The Teamcenter Express Installation Wizard has been extended to include the ability to choose typical or custom installations for the Teamcenter Express server, the two-tier client and a four-level client. Immediate feedback on errors, and online help are available for important steps of the installation process is available. 
  • Forms for change requests and change notices are now available as standard Teamcenter forms that use drop-down menus with lists of values, and can be easily changed. 
  • When upgrading Teamcenter Express to a new version of the process is simplified through new tools, including diagnoses before the upgrade and the possibility of a test run.

New licensing options and management tools

With Version 9.1 of Teamcenter Express is a new Occasional Author license is introduced.This cost-effective license is aimed at users who only occasionally use Teamcenter Express.There is also a new license monitoring tool that allows administrators to keep track of license usage and optimize easily. License data is stored in the Teamcenter Express database and reports can be created in Microsoft Excel ® format.

Superior scalability

Teamcenter Express Version 9.1 is a configuration of Teamcenter 9.1, which provides scalability. With more than 7 million users, Teamcenter is the proven market leader in the PLM domain. Because of the improved compatibility with Teamcenter, you can easily upgrade if you need more advanced features.

Support for the latest Microsoft standards

Teamcenter Express Version 9.1 is certified for Microsoft Windows Server 2008 R2 and provides full support for 64-bit versions of Windows Server and Client software - resulting in superior performance, reliability and scalability.

Friday, October 12, 2012

NX Batch Programming - Sample

Before writing a batch file you need to configure your visual studio environment. I am using Microsoft Visual Studio 8.

Step 1: Copy two folders from NX installed location to visual studio installed location so that we can able to create a NX project.


Step 2:


Step 3: Now open Visual Studio and create project.


Step 4: Select project type as "NX Open Wizard"


Step 5: 


Step 6: Here I am creating an .exe


Step 7:


Step 8: write your custom code as shown below.


Step 9: Build Solution will generate .exe in the project folder.


Step 10:


Step 11: Open NX and go-to "Roles" and click on "advanced with full menus" which will provide extra menus. 

Step 12:


Step 13: Go-to File->Execute->NX open


Step 14: Provide your .exe here


Step 15: A console will be opened and your code will be executed.


NX installation

Step 1: Start installation by "Launch.exe"

Step 2:

Step 3:


Step 4: 


Step 5:

Step 6:


Step 7:


Step 8:


Step 9: 


Step 10:


Step 11: 


Step 12:

Step 13:


 Step 14:


Step 15: 


Thursday, October 11, 2012

NX Customization

Now a days I am working on NX customization. I am a newbie in NX  particularly CAD tools because of my technical background. I searched many blogs and sites for NX customization but I didn't find any information when I googled. So, I thought to start posting some information on NX customization.

I will update soon.......

Monday, October 8, 2012

Boot From USB - Throw-away CD-Drives

Requirements:
  • USB Flash drive/Pen drive/Thumb drive, etc
  • Computer with CD/DVD drive to build this Windows XP setup Flashdisk (or you may use computer without CD/DVD drive, but you have to copy Windows XP setup files from another computer to your hard disk)
  • Computer with or without CD/DVD drive (e.g. Aspire One)
Step 1:
Download WinToFlash : click here

Step 2:
Extract the zip file, then double click on WinToFlash.exe


Step 3:
Click Accept button...

Step 4:
This program will transfer Windows setup from CD or DVD to flash drive Recommended to switch on Wizard mode for users have no experience of Windows setup fine tuning Windows setup transfer wizard Following basic instructions you will transfer Windows setup program to flash drive and install Windows on PC have no CD or DVD drive
Click the button to enter Wizard mode...


Step 5:
This program will help you to install Windows from a flash
To access other features and advanced options swicth to advanced mode (for advanced users).
for now, we will use wizard mode instead of advanced mode, so click Next...


step 6:
Specify locations of files and drive on Windows files path click Select button
Step 7:
Select CD/DVD drive that contain Windows XP CD or folder that contain Windows XP files... then click OK

step 8:
Specify locations of files and drive on USB drive click Select button

Step 9:
Select USB Flash drive ... then click OK

Step 10:
Specify locations of files and drive
Click Next button...
Step 11:
Select "I Accepted the terms of the license agreement" then click Continue...

Step 12:
Warning! Formatting will erase ALL DATA on target disk. To format press OK, to quit press Cancel

Click OK...

Step 13:
Please wait while WinToFlash transferring Windows setup to flash drive


Step 14:
Finished... click Next then Exit
USB Flash drive ready...


On computer without CD/DVD drive (e.g. Aspire One)
you must change the first boot order to USB Flash drive from BIOS. How to do this?

Change Boot order from BIOS:
This is just for example (Aspire 4710)
your BIOS interface may be slightly different

Step 1:
Plug a Flash drive into a USB port on your computer/laptop

Step 2:
Turn on your laptop then hit F2 rapidly (or Del for some other machine)
then go to Boot tab > change boot order > then hit F10 key to Save and Exit


Now you can boot from USB Flash drive, first select
1st, text mode setup (Boot from flash again after finished)
then... on the first restart, select
2nd, GUI mode setup, continue setup + 1st start of Windows
Install Windows XP as usual...


Good luck...
please let me know if you find a problem...

Saturday, October 6, 2012

Change Your IP Adress Without Disconnecting Your Modem

"How to use pd-proxy" to change your IP address and un-ban your self on any website from which you get banned and by the way, the prime purpose of using this software is "online privacy and anonymity".

Follow the below steps while using pd-proxy vpn:

Step 1: Register a free new user account for pd-proxy here.

Step 2: Confirm your account by checking your mail box.

Step 3: Now download pd-proxy software zip folder from here.

Step 4: Extract downloaded pd-proxy.zip file to your desktop.

Step 5: Now, double click on the pd-proxy.exe file to open the installer, it will   install "tap drivers" for this vpn to work with your network adapter.

Step 6: Now, enter your username and password in the pd-proxy.

Step 7: Click "connect". It will assign you a united states (us) IP address.

Step 8: Now whenever you get banned from the forums or chatrooms, just simple click "stop" button in the pd-proxy, than clear cookies and than "connect" again.

Step 9: Say "good bye" to the ban and just remember the Jerks, God gave you middle fingers.

Note: This software is completely free, this means you can use it forever and, it gives you 200 mb free data usage daily and lastly its speed is high and it never disconnects after some time,as the other free vpn providers normally do.

This vpn have catched my eyes today and won my heart and i decided to use it instead of using other free vpn.

Prevent Your FB Account from Public Searches

As soon as you create your facebook account,one most common and effective way to make your fb profile private is "make it not appear in public search results on facebook".

This means that, the people who are not your friends or you do not know them,will not be able to "see" your facebook profile,when they "facebook search" for user names like yours.

For example, suppose your facebook user name is "somex", and if someone searches for "somex" on facebook, then all the usernames/profiles/pages which contains the word "somex" will come as result. These all results are "public search results" means they are not secured well, and anyone can send them request after viewing them in the search result.

And if your profile is not secured well, and your privacy is basic, then your profile will also appear in those results,anyone can be able to send you "add friend" request.and if you are a "female" then,you will get about 10-20 friend requests daily,because strangers likes to become friend of a female.he he he.

So guys,if you want to make your fb profile somewhat private,then follow the simple steps given below:

Step1: login to your facebook account.

Step2: click the "" arrow located near "home" button.

Step3: a menu will appear,in that menu,click privacy settings.

Now you will be redirected to your privacy settings page.

Step4: on that page,click "how you connect" option there.

Step5: a popup will appear,containing different option settings.in that popup,make settings as given below:-

       1: who can look-up your profile by name?===========>friends.

     2: who can lookup using the email/phone address you provided? =>friends.

       3: who can send you friend request?=============>friends of friends.

       4: who can send you facebook messages?==========>friends.

As shown in image given below.


  Step6: Enjoy.

Battlefield II : Bad Company (Mouse Hack)

I was totally pissed off because the mouse movements of Battlefield II : Bad Company. I tried all the options (vertical invert, blahh blahh) but that sucks. Hell out of the game, I googled 'n' got this info. 

It worked after doing this shit. I don't really understand this ****ing crap. 

1. Copy the below code and save it as jabberwocky.txt

`Twas brillig, and the slithy toves
Did gyre and gimble in the wabe:
All mimsy were the borogoves,
And the mome raths outgrabe.

"Beware the Jabberwock, my son!
The jaws that bite, the claws that catch!
Beware the Jubjub bird, and shun
The frumious Bandersnatch!"

He took his vorpal sword in hand:
Long time the manxome foe he sought --
So rested he by the Tumtum tree,
And stood awhile in thought.

And, as in uffish thought he stood,
The Jabberwock, with eyes of flame,
Came whiffling through the tulgey wood,
And burbled as it came!

One, two! One, two! And through and through
The vorpal blade went snicker-snack!
He left it dead, and with its head
He went galumphing back.

"And, has thou slain the Jabberwock?
Come to my arms, my beamish boy!
O frabjous day! Callooh! Callay!'
He chortled in his joy.

`Twas brillig, and the slithy toves
Did gyre and gimble in the wabe;
All mimsy were the borogoves,
And the mome raths outgrabe.

2. Copy the below code and save it as pitoni.txt

Ba'et bashak ushlay pachzar
Be'afsay-chak savsu, makdo:
au az chilcain haya nimzar
umtay-aran kairdu.

"Gura bnee, min hapiton
mai 'chod-shino, chil-ziparno!
mayof-girgir tanoos, za'on
maychetesh bim'gono!"

Vehu shalaf saypho hachaz:
nad, cheepace et pechik-tzarav --
veko amad betzel zamzam,
tapoos beheerhoorav.

Odo omed shefa hagoot
vehapiton, einav dolkot
veesh'vesh beya'ar hamanood,
ho'e'ah venakot!

Bim'chi chazooz - habas! habas! -
ticktaich hasayif benimhar
natal et rosh pigro hazed
ve'el beito tzahar

"Af ketalto, et hapiton?
achabkecha, yaldi hatzach!
ho yom-tzilha! yabah! yabah!
bechedvato patzach.

Ba'et bashak ushlay pachzar
Be'afsay-chak savsu, makdo:
au az chilcain haya nimzar
umtay-aran kairdu.

3. Paste these two files in the installation location

Friday, October 5, 2012

Extension Points - BMIDE

The following is a list of supported extension points within the Business Modeler IDE in Teamcenter. 

Business objects
Business objects are the primary objects that Teamcenter users work with in to create product data. These business objects are modeled in the BMIDE. Business objects contain properties and behaviors and are hierarchical in nature. A new business object can be added anywhere in the hierarchy to inherit behavior from its parent business object.
  • Item
  • Form
  • Dataset
  • AppInterface
  • GDELink
  • Intermediate Data Capture
  • StructureContext
  • Runtime (View Only) and so on...

Properties
Properties are the attributes that describe the business object. There are 4 types of properties.
  • Persistent Properties :- are stored in the database
  • Compound Properties :- are properties from one object shown on another object
  • Runtime Properties :- are properties that are computed at runtime
  • Relation Properties :- are properties that show related objects

Schema
Schema is comprised of Classes and Attributes: the logical database representation of the business objects and properties. Attributes represent your meta-data and store the following data types.
  • String
  • Integer
  • Date
  • Float
  • Character
  • Logical
  • Typed Reference
  • Untyped Reference

Business Rules
Business rules are the business behavior extension points of Teamcenter. The following is a list of the behavioral extensions points in Teamcenter.
  • Display Rules
  • Naming Rules
  • Extension Rules
  • Deep Copy Rules
  • GRM Rules
  • ID Context Rules
  • Property Rules
  • Compound Properties
  • Verification Rules

List of Values
List of values provide a pick list of options for a given property in the UI. Business analyst can set up predefined lists that match the property‘s data type: String, date, integer, etc. There are four types of LOVs.
  • Standard
  • Filter
  • Hierarchal
  • Interdependent

Options
Other extension points are available for configuring tools, change, unit of measure, and so on.
  • Change
  • Tool
  • Status
  • View Type
  • PS Occurrence
  • ID Context
  • Unit of Measure
  • Storage Media

Constants
A new constants framework is available by which you can configure extension points of the system and provide some of your own.
  • Global Constants
  • Business Object Constants
  • Property Constants

Rules Engine
A rules engine framework is available for providing robust decision table logic to your customers for configuring system behavior.
  • Application Extension Points
  • Application Extension Rules
  • Business Context

Sunday, September 30, 2012

what is BMIDE?

The Business Modeler IDE (Integrated Development Environment) is a tool for configuring and extending the data model of your Teamcenter installation. The data model objects define the objects and rules used in Teamcenter. 

Administrators and business analysts use the IDE to create new data model objects such as:
          – Business objects (for example, items and datasets)
          – Properties
          – Lists of values (LOVs)
          – Rules

I can say that without BMIDE, Teamcenter may be dragged down. The Business Modeler IDE is built on top of the Eclipse platform. Eclipse is a generic platform for tool development that is extended using its plug-in and extension point technology.

BMIDE Interface


The Business Modeler IDE utilizes the Eclipse user interface, which is composed of perspectives, views, and editors. A perspective is an arrangement of views. A view is a tabbed window within the UI that provides a view of data. An editor is a window that allows you to edit source files. The user can rearrange the user interface in any configuration by dragging and dropping views and editors.

Wednesday, September 26, 2012

Teamcenter - What is the difference betweeen Precise & Imprecise assemblies?

If you work with BOMs in Teamcenter you have probably seen the terms Precise and Imprecise BOM structure. Even if you only use one type of BOM you need to understand the difference between them.

BOM View Revisions

In Teamcenter an assembly structure is represented by a BOM View. BOM Views are associated with Items, and each Item Revision will have it’s Revision of the BOM View — a BOM View Revision, or BVR.

The descriptions precise and imprecise apply to BOM view revisions. It is determined by an attribute of the BOM view revision business object.

What does Precise and Imprecise BOM Mean?

A BOM View Revision defines which components are used by a particular Item Revision. precise and imprecise describe what is meant by component. If a BVR is precise the components are item revisions; the BVR defines precisely which revision is used by the structure. If the assembly is imprecise the components are items; the BVR is not precise about the revision to which the assembly refers.

Why Precise Structures are Important?

When you release an assembly, releasing the precise structure preserves the record of exactly what it was that was developed, approved and released. It is an important historical artifact, particularly of the CAD data.

Why Imprecise Structures are not Important?

Imprecise Assemblies can be used in Industries where there is no concept of Revisions.

For Example:  In Retail Industry there will not be any concept of Revising the Assembly (ex: Shirt Assembly). They will save as and create a new Shirt for the next season. In those cases I think Imprecise Structure concept is apt.

Precise and Imprecise Assemblies

We start the examples with four component items with two revisions, 01 and 02, of each. Each revision may be Released, meaning it has a status, or working, meaning it has no status.
                                                                              Component Items

Next, we have two assemblies which both use these four components. The first, IMP-100, has an imprecise assembly structure, while the second, PRE-200, has a precise assembly structure.

Assembly with an Imprecise structure
                   

* The imprecise assembly stores references to items not item revisions and they are dynamic.

Assembly with a Precise structure

* The precise assembly stores references to specific item revisions, not items. In this case it refers to revision 01 of each of its components. The precise assembly has static structure.