Friday, February 8, 2013

Advanced Pointers

  1. Constant pointer and pointer to constant.
  2. Pointer to pointer with an example
  3. Array of pointers with an example
  4. Pointer to functions with an example

1. C Constant Pointer and Pointer to Constant

As a developer, you should understand the difference between constant pointer and pointer to constant.

C Constant pointer

A pointer is said to be constant pointer when the address its pointing to cannot be changed.
Lets take an example :
char ch, c;
char *ptr = &ch;
ptr = &c;
In the above example we defined two characters (‘ch’ and ‘c’) and a character pointer ‘ptr’. First, the pointer ‘ptr’ contained the address of ‘ch’ and in the next line it contained the address of ‘c’. In other words, we can say that Initially ‘ptr’ pointed to ‘ch’ and then it pointed to ‘c’.
But in case of a constant pointer, once a pointer holds an address, it cannot change it. This means a constant pointer, if already pointing to an address, cannot point to a new address.
If we see the example above, then if ‘ptr’ would have been a constant pointer, then the third line would have not been valid.
A constant pointer is declared as :
<type-of-pointer> *const <name-of-pointer>
For example :
#include<stdio.h>
int main(void) {
char c = 'a';
char ch = 'c';
char *const ptr = &ch; // A constant pointer
ptr = &c; // Trying to assign new address to a constant pointer. WRONG!!!!
return 0;
}
When the code above is compiled, compiler gives the following error :
$ gcc -Wall constptr.c -o constptr
constptr.c: In function ‘main’:
of read-only variable ‘ptr’
constptr.c:9: error: assignment
So we see that, as expected, compiler throws an error since we tried to change the address held by constant pointer.
Now, we should be clear with this concept. Lets move on.

C Pointer to Constant

This concept is easy to understand as the name simplifies the concept. Yes, as the name itself suggests, this type of pointer cannot change the value at the address pointed by it.
Lets understand this through an example :
char ch = 'c';
char *ptr = &ch;
*ptr = 'a';
In the above example, we used a character pointer ‘ptr’ that points to character ‘ch’. In the last line, we change the value at address pointer by ‘ptr’. But if this would have been a pointer to a constant, then the last line would have been invalid because a pointer to a constant cannot change the value at the address its pointing to.
A pointer to a constant is declared as :
const <type-of-pointer> *<name-of-pointer>;
For example :
#include<stdio.h>
int main(void) {
const char *p;
char ch = 'c';
tr = &ch; // A constant pointer 'ptr' pointing to 'ch'
*ptr = 'a';// WRONG!!! Cannot change the value at address pointed by 'ptr'.
return 0;
}
When the above code was compiled, compiler gave the following error :
$ gcc -Wall ptr2const.c -o ptr2const
ptr2const.c: In function ‘main’:
of read-only location ‘*ptr’
ptr2const.c:7: error: assignment
So now we know the reason behind the error above ie we cannot change the value pointed to by a constant pointer.

2. C Pointer to Pointer

Till now we have used or learned pointer to a data type like character, integer etc. But in this section we will learn about pointers pointing to pointers.
As the definition of pointer says that its a special variable that can store the address of an other variable. Then the other variable can very well be a pointer. This means that its perfectly legal for a pointer to be pointing to another pointer.
Lets suppose we have a pointer ‘p1′ that points to yet another pointer ‘p2′ that points to a character ‘ch’. In memory, the three variables can be visualized as :
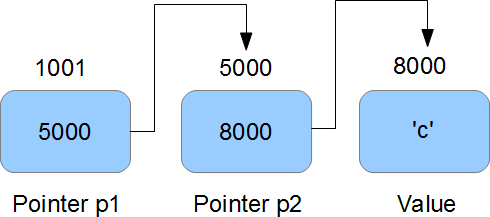
So we can see that in memory, pointer p1 holds the address of pointer p2. Pointer p2 holds the address of character ‘ch’.
So ‘p2′ is pointer to character ‘ch’, while ‘p1′ is pointer to ‘p2′ or we can also say that ‘p2′ is a pointer to pointer to character ‘ch’.
Now, in code ‘p2′ can be declared as :
char *p2 = &ch;
But ‘p1′ is declared as :
char **p1 = &p2;
So we see that ‘p1′ is a double pointer (ie pointer to a pointer to a character) and hence the two *s in declaration.
Now,
  • ‘p1′ is the address of ‘p2′ ie 5000
  • ‘*p1′ is the value held by ‘p2′ ie 8000
  • ‘**p1′ is the value at 8000 ie ‘c’
I think that should pretty much clear the concept, lets take a small example :
#include<stdio.h>
int main(void) {
char *p = NULL;
char **ptr = NULL; char c = 'd'; p = &c;
    ptr = &p; 

    printf("\n c = [%c]n",c);
   printf("\n **ptr = [%c]n",**ptr);
   printf("\n *p = [%c]\n",*p);
return 0; }
Here is the output :
$ ./doubleptr
c = [d]
**ptr = [d]
*p = [d]

3. C Array of Pointers

Just like array of integers or characters, there can be array of pointers too.
An array of pointers can be declared as :
<type> *<name>[<number-of-elements];
For example :
char *ptr[3];
The above line declares an array of three character pointers.
Lets take a working example :
#include<stdio.h>
int main(void) {
manshu"; char *p2 = "A
char *p1 = "H irora"; char *p3 = "India";
1; arr[1] = p2
char *arr[3]; arr[0] = p; arr[2] = p3;
] \n",p1); printf("\n p2 = [%
printf("\n p1 = [% ss] \n",p2); printf("\n p3 = [%s] \n",p3);
tf("\n arr[1] = [%s] \n",arr[1]); pri
printf("\n arr[0] = [%s] \n",arr[0]); pri nntf("\n arr[2] = [%s] \n",arr[2]); return 0;
}
In the above code, we took three pointers pointing to three strings. Then we declared an array that can contain three pointers. We assigned the pointers ‘p1′, ‘p2′ and ‘p3′ to the 0,1 and 2 index of array. Let’s see the output :
$ ./arrayofptr
p1 = [Himanshu]
p2 = [Arora]
rr[0] = [Himan
p3 = [India] ashu] arr[1] = [Arora]
arr[2] = [India]
So we see that array now holds the address of strings.

4. C Function Pointers

Just like pointer to characters, integers etc, we can have pointers to functions.
A function pointer can be declared as :
<return type of function> (*<name of pointer>) (type of function arguments)
For example :
int (*fptr)(int, int)
The above line declares a function pointer ‘fptr’ that can point to a function whose return type is ‘int’ and takes two integers as arguments.
Lets take a working example :
#include<stdio.h>
int func (int a, int b)
{
printf("\n a = %d\n",a);
printf("\n b = %d\n",b);
d) { int(
return 0; } int main(void*fptr)(int,int); // Function pointer
nction pointer func(2,3); fptr(2,3); re
fptr = func; // Assign address to f uturn 0;
}
In the above example, we defined a function ‘func’ that takes two integers as inputs and returns an integer. In the main() function, we declare a function pointer ‘fptr’ and then assign value to it. Note that, name of the function can be treated as starting address of the function so we can assign the address of function to function pointer using function’s name. Lets see the output :
$ ./fptr
a = 2
a = 2
b = 3 b = 3
So from the output we see that calling the function through function pointer produces the same output as calling the function from its name.
Pointers

What are Pointers?
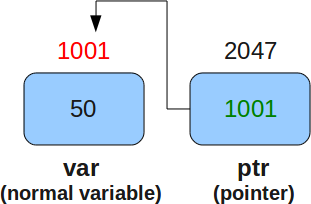
Different from other normal variables which can store values, pointers are special variables that can hold the address of a variable. Since they store memory address of a variable, the pointers are very commonly said to “point to variables”. Lets try to understand the concept.

As shown in the above diagram:
  • A normal variable ‘var’ has a memory address of 1001 and holds a value 50.
  • pointer variable has its own address 2047 but stores 1001, which is the address of the variable ‘var’

How to Declare a Pointer?

A pointer is declared as :
<pointer type> *<pointer-name>
In the above declaration :
  1. pointer-type : It specifies the type of pointer. It can be int,char, float etc. This type specifies the type of variable whose address this pointer can store.
  2. pointer-name : It can be any name specified by the user. Professionally, there are some coding styles which every code follows. The pointer names commonly start with ‘p’ or end with ‘ptr’
An example of a pointer declaration can be :
char *chptr;
In the above declaration, ‘char’ signifies the pointer type, chptr is the name of the pointer while the asterisk ‘*’ signifies that ‘chptr’ is a pointer variable.

How to initialize a Pointer?

A pointer is initialized in the following way :
<pointer declaration(except semicolon)> = <address of a variable>
OR <pointer declaration>
of a variable>
<name-of-pointer> = <addres s
Note that the type of variable above should be same as the pointer type.(Though this is not a strict rule but for beginners this should be kept in mind).
For example :
char ch = 'c';
char *chptr = &ch; //initialize
OR char ch = 'c';
&ch //initia
char *chptr; chptr =
lize
In the code above, we declared a character variable ch which stores the value ‘c’. Now, we declared a character pointer ‘chptr’ and initialized it with the address of variable ‘ch’.
Note that the ‘&’ operator is used to access the address of any type of variable.

How to Use a Pointer?

A pointer can be used in two contexts.
Context 1: For accessing the address of the variable whose memory address the pointer stores.
Again consider the following code :
char ch = 'c';
char *chptr = &ch;
Now, whenever we refer the name ‘chptr’ in the code after the above two lines, then compiler would try to fetch the value contained by this pointer variable, which is the address of the variable (ch) to which the pointer points. i.e. the value given by ‘chptr’ would be equal to ‘&ch’.
For example :
char *ptr = chptr;
The value held by ‘chptr’ (which in this case is the address of the variable ‘ch’) is assigned to the new pointer ‘ptr’.
Context 2: For accessing the value of the variable whose memory address the pointer stores.
Continuing with the piece of code used above :
char ch = 'c';
char t;
ptr = &ch; t = *ch
char *c
hptr;
We see that in the last line above, we have used ‘*’ before the name of the pointer. What does this asterisk operator do?
Well, this operator when applied to a pointer variable name(like in the last line above) yields the value of the variable to which this pointer points. Which means, in this case ‘*chptr’ would yield the value kept at address held by chptr. Since ‘chptr’ holds the address of variable ‘ch’ and value of ‘ch’ is ‘c’, so ‘*chptr’ yeilds ‘c’.
When used with pointers, the asterisk ‘*’ operator is also known as ‘value of’ operator.

An Example of C Pointers

Consider the following code :
CODE :
#include <stdio.h>
int main(void) {
char *chptr =
char ch = 'c' ; &ch; int i = 20;
float f = 1.20000;
int *intptr = &i; float *fptr = &f;
tring"; printf("\n [%c], [%
char *ptr = "I am a
sd], [%f], [%c], [%s]\n", *chptr, *intptr, *fptr, *ptr, ptr);
return 0;
}
OUTPUT :
$ ./pointers
[c], [20], [1.200000], [I], [I am a string]
To debug a C program, use gdb. The above code covers all the common pointers. The first three of them are very trivial now to understand so lets concentrate on the fourth one. In the fourth example, a character pointer points to a string.
In C, a string is nothing but an array of characters. So we have no staring pointers in C. Its the character pointers that are used in case of strings too.
Now, coming to the string, when we point a pointer to a string, by default it holds the address of the first character of the string. Lets try to understand it better.
The string, ‘I am String’ in memory is placed as :
1001 1002 1003 1004 1005 1006 1007 1008 1009 1010
I a m S t r i n g \0
Since characters occupy one byte each, so they are placed like above in the memory. Note the last character, its a null character which is placed at the end of every string by default in C. This null character signifies the end of the string.
Now coming back to the point, any character pointer pointing to a string stores the address of the first character of the string. In the code above, ‘ptr’ holds the address of the character ‘I’ ie 1001. Now, when we apply the ‘value of’ operator ‘*’ to ‘ptr’, we intend to fetch the value at address 1001 which is ‘I’ and hence when we print ‘*ptr’, we get ‘I’ as the output.
Also, If we specify the format specifier as ‘%s’ and use ‘ptr’ (which contains the starting address of the string), then the complete string is printed using printf. The concept is that %s specifier requires the address of the beginning byte of string to display the complete string, which we provided using ‘ptr’ (which we know holds the beginning byte address of the string). This we can see as the last print in the output above.

Pointers as Structure Objects

Consider the following code :
CODE:
#include<stdio.h>
struct st{ int a;
ain(void
char ch; }; int m) { struct st obj;
obj; stobj->a = 5;
struct st *stobj = &stobj->ch = 'a';
[%c]\n", stobj->a, stobj->ch); return 0; }
printf("\n [%d]
OUTPUT:
$ ./pointers
[5] [a]
In the above code, we have declared a pointer stobj of type ‘struct st’. Now since the pointer type is a structure, so the address it points to has to be of a ‘struct st’ type variable(which in this case is ‘obj’). Other interesting part is how structure elements are accessed using pointer variable ‘stobj’. Yes, When dealing with pointer objects, its a standard to use arrow operator -> instead of ‘.’ operator(which would have been used, had we used ‘obj’ to access the structure elements).

How to call C# DLL from C++ DLL

This step-by-step post describes how to call a managed DLL from native C++ code. To do this, create a simple managed DLL by using Microsoft Visual C# .NET or Microsoft Visual C# 2008, and then call this managed DLL from native C++ code.

Requirements

This article assumes that you are familiar with the following topics:
  • Writing Component Object Model (COM) clients
  • COM interoperability in the Microsoft .NET Framework

The following list outlines the recommended hardware, software, network infrastructure, and service packs that you need:
  • Visual C# .NET or Visual C# 2008
  • Visual C++ .NET or Visual C++ 2008

Write a Managed DLL

To create a simple managed DLL that has a public method to add two numbers and return the result, follow these steps:
  1. Start Microsoft Visual Studio .NET or Microsoft Visual Studio 2005.
  2. On the File menu, point to New, and then click Project. The New Project dialog box opens.
  3. Under Project Types, click Visual C# Projects.

    Note In Visual Studio 2005, click Visual C# under Project Types.
  4. Under Templates, click Class Library.
  5. In the Name text box, type ManagedDLL, and then click OK.
  6. Open the Class1.cs file in Code view.
  7. To declare a public interface that has a method to add two numbers, add the following code to the Class1.cs file:

    // Interface declaration.
    public interface ICalculator
    {
        int Add(int Number1, int Number2);
    };
  8. To implement this public interface in a class, add the following code to the Class1.cs file:

    // Interface implementation.
    public class ManagedClass:ICalculator
    {
        public int Add(int Number1,int Number2)
            {
                return Number1+Number2;
            }
    }
  9. Click Start, and then point to Programs.
  10. If you are using Microsoft Visual Studio .NET 2003, point to Microsoft Visual Studio .NET 2003, and then point toVisual Studio .NET Tools. If you are using Microsoft Visual Studio .NET 2002, point to Microsoft Visual Studio .NET, and then point to Visual Studio .NET Tools. If you are using Visual Studio 2005, point to Microsoft Visual Studio 2005, and then point to Visual Studio 2005 Tools.
  11. If you are using Visual Studio .NET 2003, click Visual Studio .NET 2003 Command Prompt to open a Visual Studio .NET command prompt. If you are using Visual Studio .NET 2002, click Visual Studio .NET Command Prompt to open a Visual Studio .NET command prompt. If you are using Visual Studio 2005, click Visual Studio 2005 Command Promptto open a Visual Studio 2005 command prompt.
  12. To create a strong name for your class library, type the following command at the Visual Studio .NET command prompt:
    sn.exe -k MyKeyFile.SNK
  13. Copy the MyKeyFile.SNK file to your project folder.
  14. Double-click the AssemblyInfo.cs file to open the file in Solution Explorer.
  15. Replace the following lines of code in the AssemblyInfo.cs file

    [assembly: ComVisible(false)]
    [assembly: AssemblyDelaySign(false)]
    [assembly: AssemblyKeyFile("")]
    with the following.

    [assembly: ComVisible(true)] 
    [assembly: AssemblyDelaySign(false)] 
    [assembly: AssemblyKeyFile("..\\..\\MyKeyFile.SNK")]
  16. Press CTRL+SHIFT+B to generate the managed DLL.

Register the Managed DLL for Use with COM or with Native C++

To use the managed DLL with COM or with native C++, you must register the assembly information of your DLL in the Windows registry. To do this, follow these steps:
  1. Click Start, and then point to Programs.
  2. If you are using Microsoft Visual Studio .NET 2003, point to Microsoft Visual Studio .NET 2003, and then point toVisual Studio .NET Tools. If you are using Microsoft Visual Studio .NET 2002, point to Microsoft Visual Studio .NET, and then point to Visual Studio .NET Tools. If you are using Visual Studio 2005, point to Microsoft Visual Studio 2005, and then point to Visual Studio 2005 Tools
  3. If you are using Visual Studio .NET 2003, click Visual Studio .NET 2003 Command Prompt to open a Visual Studio .NET command prompt. If you are using Visual Studio .NET 2002, click Visual Studio .NET Command Prompt to open a Visual Studio .NET command prompt. If you are using Visual Studio 2005, click Visual Studio 2005 Command Promptto open a Visual Studio 2005 command prompt.
  4. At the Visual Studio .NET or Visual Studio 2005 command prompt, change the directory path of the directory that contains your managed DLL.
  5. To register the assembly information of your managed DLL in the Windows registry and to create a corresponding type library, run the following command at the Visual Studio .NET command prompt:
    RegAsm.exe ManagedDLL.dll /tlb:ManagedDLL.tlb /codebase

Call the Managed DLL from Native C++ Code

To call the managed DLL that you just created from native C++ code, follow these steps:
  1. Start Visual Studio .NET or Visual Studio 2005.
  2. On the File menu, point to New, and then click Project.
  3. If you are using Visual C++ .NET 2003, click Visual C++ Projects under Project Types, and then click Win32 Console Project under Templates. If you are using Visual C++ .NET 2002, click Visual C++ Projects under Project Types, and then click Win32 Project under Templates. If you are using Visual C++ 2005, click Visual C++ under Project Types, and then click Win32 Project under Templates
  4. In the Name text box, type CPPClient, and then click OK.
  5. If you are using Visual C++ .NET 2003 or Visual C++ 2005, click Finish. If you are using Visual C++ .NET 2002, clickApplication Settings, click Console Application, and then click Finish.
  6. Open the CPPClient.cpp file in Code view.
  7. To import the type library that RegAsm.exe generates, add the following code to the CPPClient.cpp file:

    // Import the type library.
    #import "..\ManagedDLL\bin\Debug\ManagedDLL.tlb" raw_interfaces_only
    Change the path of the type library if the path on your computer differs from this path.
  8. To declare the namespace to use, add the following code to the CPPClient.cpp file:

    using namespace ManagedDLL;
  9. To call the managed DLL, add the following code to the _tmain function:

    // Initialize COM.
    HRESULT hr = CoInitialize(NULL);
    
    // Create the interface pointer.
    ICalculatorPtr pICalc(__uuidof(ManagedClass));
    
    long lResult = 0;
    
    // Call the Add method.
    pICalc->Add(5, 10, &lResult);
    
    wprintf(L"The result is %d", lResult);
    
    // Uninitialize COM.
    CoUninitialize();
    return 0;
  10. Press CTRL+F5 to run the application.

Complete Code Listing

Managed DLL

// Class1.cs
// A simple managed DLL that contains a method to add two numbers.
using System;

namespace ManagedDLL
{
 // Interface declaration.
    public interface ICalculator
    {
        int Add(int Number1, int Number2);
    };

    // Interface implementation.
 public class ManagedClass:ICalculator
 {
       public int Add(int Number1,int Number2)
            {
                return Number1+Number2;
            }
 }
}
C++ Client

// CPPClient.cpp: Defines the entry point for the console application.
// C++ client that calls a managed DLL.

#include "stdafx.h"
#include "tchar.h"
// Import the type library.

#import "..\ManagedDLL\bin\Debug\ManagedDLL.tlb" raw_interfaces_only
using namespace ManagedDLL;
int _tmain(int argc, _TCHAR* argv[])
{
    // Initialize COM.
    HRESULT hr = CoInitialize(NULL);

    // Create the interface pointer.
    ICalculatorPtr pICalc(__uuidof(ManagedClass));

    long lResult = 0;

    // Call the Add method.
    pICalc->Add(5, 10, &lResult);

    wprintf(L"The result is %d\n", lResult);


    // Uninitialize COM.
    CoUninitialize();
    return 0;
}
Note You must add the common language runtime support compiler option (/clr:oldSyntax) in Visual C++ 2005 to successfully compile this code sample. To do this, follow these steps:
  1. Click Project, and then click ProjectName Properties.

    Note ProjectName represents the name of the project.
  2. Expand Configuration Properties, and then click General.
  3. Click to select Common Language Runtime Support, Old Syntax (/clr:oldSyntax) in the Common Language Runtime support project setting on the right pane, click Apply, and then click OK.

PDF Generation for Teamcenter Workflow

The requirement is to generate a PDF containing the approval details and approver details after completion of each task in a workflow. 

Solution Approach:


1. Write an action handler and attach it to complete status of the task so that   after completion of that particular task, action handler DLL should be called.


2. Write ITK APIs to get the information of approval and approver.

    For E.g. 
                ifail = CR_ask_decision(job_tag,task_name,current_user_tag[ctr-1],&decision,comments,&last_mod_date);

3. Call C# DLL from the action handler and pass the attributes containing the information required to C# DLL.

    Click here to know:  How to call C# DLL from C++ DLL

4. In C# DLL, using COM APIs open your existing word document containing pre-defined form fields.


5. Using COM APIs insert values into word document and export it as PDF using, 


my_document.ExportAsFixedFormat(fnames, WdExportFormat.wdExportFormatPDF, false, WdExportOptimizeFor.wdExportOptimizeForOnScreen, WdExportRange.wdExportAllDocument, 1, 1, WdExportItem.wdExportDocumentContent, true, true, WdExportCreateBookmarks.wdExportCreateHeadingBookmarks, true, true, false, ref oMissing);


6. Attach the generated PDF as named reference to the dataset of current item revision.