Showing posts with label Eclipse RCP. Show all posts

Tuesday, May 20, 2014

RAC : PSE Clone Structure

In ITK we have several APIs to clone an existing structure. If you are working on client-side, here is an example to clone a structure.

private void BOMClone
                 (TCComponentItem oldItem,
TCComponentItem newItem, 
                        TCSession session) throws TCException 
{
// TODO Auto-generated method stub
TCComponentBOMWindow oldBomWindow = null;
TCComponentBOMWindow newBomWindow = null;
try {
       TCComponentRevisionRuleType ruleType =                                                                                 (TCComponentRevisionRuleType) session
                                   .getTypeComponent("RevisionRule");
               TCComponentRevisionRule defRule = ruleType.getDefaultRule();
               TCComponentBOMWindowType bomType =                                                                                (TCComponentBOMWindowType) session
                                    .getTypeComponent("BOMWindow");
               oldBomWindow = bomType.create(defRule);
       oldBomWindow.setWindowTopLine(oldItem, null, null, null);
       TCComponentBOMLine oldBomTopLine =                                                                                             oldBomWindow.getTopBOMLine();
       AIFComponentContext[] oldBomContext =                                                                                              oldBomTopLine.getChildren();
       TCComponentItemRevision[] childItems  = new                                                                TCComponentItemRevision[oldBomContext.length];
               for ( int i=0; i < oldBomContext.length; i++ ) 
       {
 if ( oldBomContext[i].getComponent() instanceof                                                                           TCComponentBOMLine )
 {
 TCComponentBOMLine childBomLine = new                                                                                           TCComponentBOMLine();
 childBomLine =(TCComponentBOMLine)                                                                                           oldBomContext[i].getComponent();
                 childItems[i] = (TCComponentItemRevision)                                                                                     childBomLine.getItemRevision();
 }
       }
       newBomWindow = bomType.create(defRule);
       newBomWindow.setWindowTopLine(newItem, null, null, null);
       TCComponentBOMLine newBomTopLine =                                                                                        newBomWindow.getTopBOMLine();
         newBomTopLine.add(null, childItems);
       newBomWindow.save();
       newBomWindow.close();
       oldBomWindow.close();
        catch (TCException e) 
        {
       // TODO Auto-generated catch block
       e.printStackTrace();
}
}

Thursday, April 17, 2014

Connect to a URL using Basic Authentication : JAVA

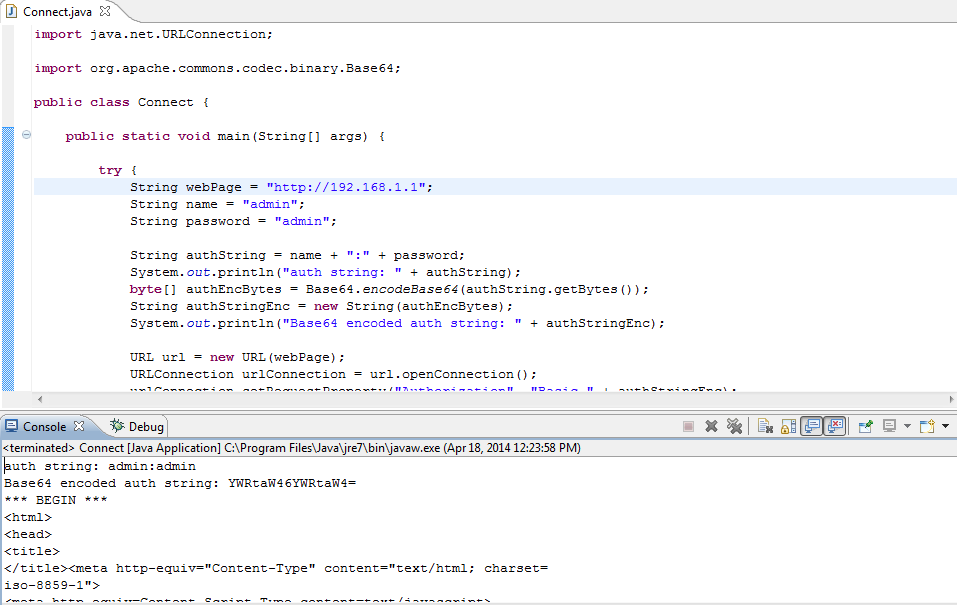
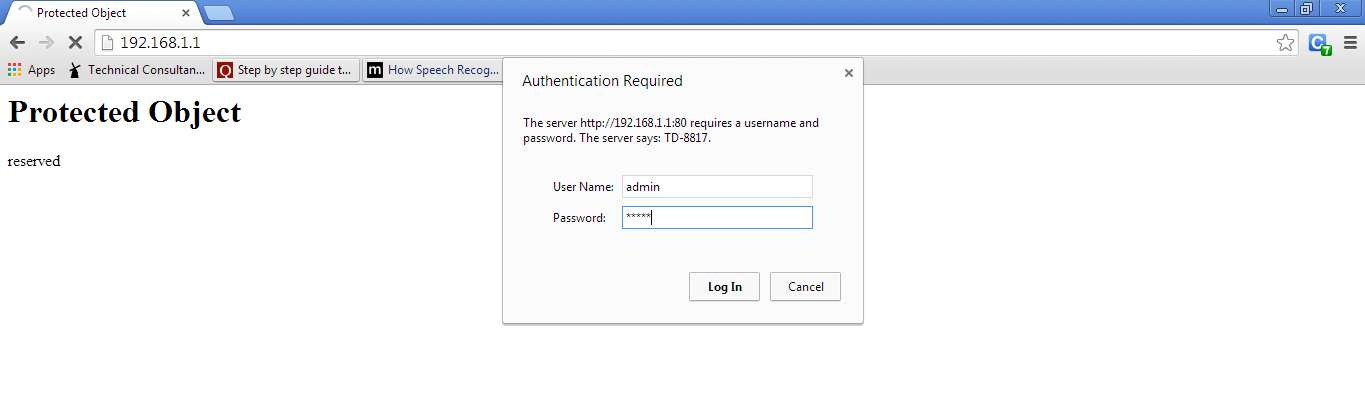
The Connect class connects to a web page using Basic authentication. It takes a name and a password and concatenates them with a colon in between. It Base64 encodes the resulting string. It makes a URL connection to a web site and sets the 'Authorization' request property to be 'Basic <base-64-encoded-auth-string>' . It reads the content from the URL and displays it to standard output.

Connect.java
import java.io.IOException;
import java.io.InputStream;
import java.io.InputStreamReader;
import java.net.MalformedURLException;
import java.net.URL;
import java.net.URLConnection;

import org.apache.commons.codec.binary.Base64;

public class Connect {

public static void main(String[] args) {

try {
String webPage = "http://192.168.1.1";
String name = "admin";
String password = "admin";

String authString = name + ":" + password;
System.out.println("auth string: " + authString);
byte[] authEncBytes = Base64.encodeBase64(authString.getBytes());
String authStringEnc = new String(authEncBytes);
System.out.println("Base64 encoded auth string: " + authStringEnc);

URL url = new URL(webPage);
URLConnection urlConnection = url.openConnection();
urlConnection.setRequestProperty("Authorization", "Basic " + authStringEnc);
InputStream is = urlConnection.getInputStream();
InputStreamReader isr = new InputStreamReader(is);

int numCharsRead;
char[] charArray = new char[1024];
StringBuffer sb = new StringBuffer();
while ((numCharsRead = isr.read(charArray)) > 0) {
sb.append(charArray, 0, numCharsRead);
}
String result = sb.toString();

System.out.println("*** BEGIN ***");
System.out.println(result);
System.out.println("*** END ***");
} catch (MalformedURLException e) {
e.printStackTrace();
} catch (IOException e) {
e.printStackTrace();
}
}

}


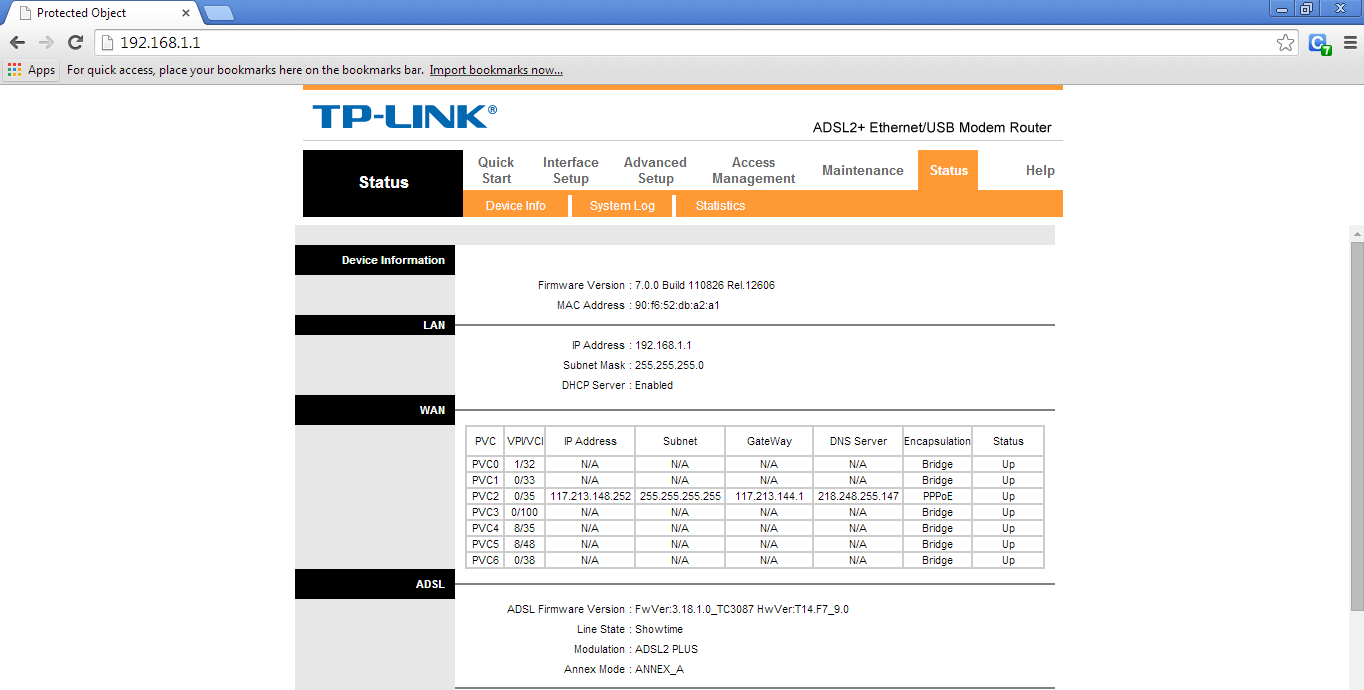
Code similar to Connect.java allows me to connect to my TP-LINK router and read the current IP address of my router. I can take this IP information and send it to a web application deployed on the web. As a result, I can then forward requests from the deployed web application through the router to my local machine. This technique requires me to forward requests to my router to port 8080 to my local machine on port 8080, as shown below.


Wednesday, April 9, 2014

Linux Crontab

How to set-up a crontab file ?

In Linux, Cron is a daemon/service that executes shell commands periodically on a given schedule. Cron is driven by a crontab, a configuration file that holds details of what commands are to be run along with a timetable of when to run them.

Creating a crontab file

You can create a crontab file by entering the following terminal command:
crontab -e

Entering the above command will open a terminal editor with a new blank crontab file, or it will open an existing crontab if you already have one. You can now enter the commands to be executed, see syntax below, before saving the file and exiting the editor. As long as your entries were entered correctly your commands should now be executed at the times/dates you specified. You can see a list of active crontab entries by entering the following terminal command:

crontab -l


Crontab Syntax

A crontab file has six fields for specifying minute, hour, day of month, month, day of week and the command to be run at that interval. See below:

*     *     *     *     *  command to be executed
-     -     -     -     -
|     |     |     |     |
|     |     |     |     +----- day of week (0 - 6) (Sunday=0)
|     |     |     +------- month (1 - 12)
|     |     +--------- day of month (1 - 31)
|     +----------- hour (0 - 23)
+------------- min (0 - 59)

My requirement is to generate a report in excel file every 15 minutes. So, I have a jar say Reports.jar file to be executed. 

Schedule a Background Cron Job For Every 15 Minutes.

*/15 * * * * /usr/java/jdk1.6.0_34/bin/java -jar ./Reports.jar >> ./cronlog.txt

*/15 - Minute to run on, a value of 0-59: /15 means every 15 minutes
*       - The Hour, a value of 0-23: * means every hour
*       - Day of the Month, 1-31: * means every day of the month
*       - The Month, 1-12: * means every month
*       - Day of the Week, 0-7 (0 and 7 are both Sunday): * means every day
The Command: /usr/java/jdk1.6.0_34/bin/java -jar ./Reports.jar >> ./cronlog.txt execute jar and write result to cronlog.txt file

Friday, February 28, 2014

SOA - Update Schedule Object

I was writing SOA code to modify schedule object, thought it will be helpful if I share....
#1. My requirement is to update a schedule object.
#2. I cannot directly update a schedule object using RAC API until unless it is a TCComponent.
#3. I searched for ScheduleManagementService from BMIDE services folder. 
#4. To establish any SOA service, we need to get the service connection by,


#5. As my requirement is to only update schedule object.
            a. Firstly, I need to get the schedule object tag.
            bI found that I can use ServiceData data =                                                          scmService.updateSchedules(updateContainer); service to update schedules.
Data is SOA service return information
updateContainer contains all information of your updated schedule object. // look into the attachment for further usage of update container.
  
Hope this is helpful....


// modify "is_template" attribute value to "no"...
modifySchedule(schedules,session);
private void modifySchedule(TCComponent[] schedules, TCSession session) {
// TODO Auto-generated method stub
session = (TCSession) AIFUtility.getDefaultSession();
System.out.println("**** SESSION= "+session);
ScheduleManagementService scmService = ScheduleManagementService.getService(session);
try {
for (int inx = 0; inx < schedules.length; inx++) {
        String objectName = schedules[inx].getProperty("object_name");                     
        TCComponent schedule = schedules[inx];
        AttributeUpdateContainer[] attributeContainer = new                                                                         AttributeUpdateContainer[1];
        attributeContainer[0] = new AttributeUpdateContainer();
        attributeContainer[0].attrName = "is_template";
        attributeContainer[0].attrType = 6;
        attributeContainer[0].attrValue = Boolean.toString(false);
        ObjectUpdateContainer[] updateContainer = new ObjectUpdateContainer[1];
        updateContainer[0] = new ObjectUpdateContainer();
        updateContainer[0].object = schedule;
        updateContainer[0].updates = attributeContainer;
     try {
     ServiceData data = scmService.updateSchedules(updateContainer);
     } catch (ServiceException e) {
     // TODO Auto-generated catch block
     e.printStackTrace();
     }    
     }
     } catch (TCException e) {
     // TODO Auto-generated catch block
     e.printStackTrace();
     }
}
Monday, October 7, 2013

Teamcenter: ITK BOM Clone Trick

I have searched this API usage in GTAC and the result was none. After writing many lines of code, found that one single API can rule out the change.
(Sometimes SMALL things can do BIG).
int Clone_init()
{
    tag_t tItem         = NULLTAG;
    tag_t tItemRev      = NULLTAG;
    tag_t tBomWindow    = NULLTAG;
    tag_t tBomLine      = NULLTAG;
    tag_t tNewProd      = NULLTAG;
    tag_t tRevRuleTag   = NULLTAG;
   
    //top line item holding the whole structure
    tItem = ITEM_find_item("000236");
    tItemRev = ITEM_find_rev("000236","A");
   
    ITK_CALL( BOM_create_window ( &tBomWindow ) );
    ITK_CALL ( BOM_set_window_pack_all (tBomWindow, true));
    ITK_CALL ( CFM_find ("Latest Working", &tRevRuleTag ));
    ITK_CALL ( BOM_set_window_config_rule (tBomWindow, tRevRuleTag ));
    ITK_CALL( BOM_set_window_top_line ( tBomWindow, tItem, tItemRev, NULLTAG, &tBomLine ));
    //This API is similar to File->New->Item from Template option.
    ITK_CALL( ME_create_product_from_template( "","A","Test Name","Test Desc",tItemRev,tRevRuleTag,tBomWindow,"Product.Template.Cloning",&tNewProd ));
    return 0;
}

THE RESULT:

Thursday, January 31, 2013

EventViewer - Find Application Information on Machine

It is good to know about events in the Event Viewer. Today I had learnt to know about this events and so I am writing this post.

I used to believe that only registry entries will notify the user/administrator regarding the installation and un-installation details of a software or an application being executed in the machine. But it was over-whelming moment for me when I know about this event thing.

After that moment, I digged more into that subject about Event Viewer and found an interesting about it. 

If you want to track all the details of applications installed and removed from a computer, here is the information for you ;) 

Good to know before "SOMEONE" catches you :P

In these days of malware, spyware, and compliance regulations, a lot of admins are looking to track the installation of unauthorized programs, and/or the removal of required programs from client desktops. There are actually several events you can look for in both the Application Event Log and Security Event Log that will help you do this.

In the Application log, setup packages that use the Windows Installer to install themselves will create numerous events, all with an event source of MsiInstaller.

Event ID 11707 tells you when a install completes successfully, and also the user who executed the install package.

Event Type: Information
Event Source: MsiInstaller
Event Category: None
Event ID: 11707
Date: 11/9/2006
Time: 3:21:45 PM
User: DOMAIN\USER
Computer: COMPUTERNAME
Description:
Product: Event Archiver Enterprise -- Installation operation completed successfully.

Event ID 11724 tells you when a software package is removed successfully, again logging the user behind the operation.

Event Type: Information
Event Source: MsiInstaller
Event Category: None
Event ID: 11724
Date: 11/12/2007
Time: 7:50:13 PM
User: DOMAIN\USER
Computer: COMPUTERNAME
Description:
Product: Event Archiver Enterprise -- Removal completed successfully.

You can track both of these events in our Event Analyst software by setting up appropriate filters and building a custom report.

Event ID 592
Also, if you want to correlate the name of the executable setup package that was executed to install a piece of software, turn on Process Tracking auditing on the relevant Group Policy Object for one or more computers (e.g. Domain Security Policy, Local Security Policy), and look for events with Event ID 592 in the Security log that occur around the time of the 11707 event in the Application log, e.g.

Event Type: Success Audit
Event Source: Security
Event Category: Detailed Tracking
Event ID: 592
Date: 11/9/2006
Time: 3:20:30 PM
User: DOMAIN\USER
Computer: COMPUTERNAME
Description:
A new process has been created:
New Process ID: 2816
Image File Name: \EvntArch.exe
Creator Process ID: 516
User Name: USER
Domain: DOMAIN
Logon ID: (0x0,0x3E7)

Event Analyst also has a built-in Process Usage report that is very useful for viewing all of the executable files that were loaded and unloaded on one or more systems for a given time frame. It automatically determines the executable files that are run the most frequently for any given user.

Following this I will be posting about deleting the installation details from the Event Viewer in my next post.

Sunday, September 9, 2012

Eclipse Questions and Answers


1. When does a plugin get started?
Each plug-in can be viewed as having a declarative section and a code section. The declarative part is contained in the plugin.xml file. This file is loaded into a registry when the platform starts up and so is always available, regardless of whether a plug-in has started. The code section are laze loaded by default. They are activated only when their functionality has been explicitly invoked by the user.

2. What are extensions and extension points?
Loose coupling in Eclipse is achieved partially through the mechanism of extensions and extension points. When a plug-in wants to allow other plug-ins to extend or customize portions of its functionality, it will declare an extension point. The extension point declares a typically a combination of XML markup and Java interfaces, that extensions must conform to. Plug-ins that want to connect to that extension point must implement that contract in their extension.

3. How to access UI objects from a non-ui thread?
Use Display.getDefault().asyncExec(new Runnable()...) Display.asyncExec causes the run() method of the runnable to be invoked by the user-interface thread at the next reasonable opportunity. The caller of this method continues to run in parallel, and is not notified when the runnable has completed.

4. How to fire a key event in my test code to make the program act as if a user pressed a key?
Two ways to implement it in code: generating OS level key event use Display.post(Event) or use Widge.notifyListeners(...) to just notify a widget's listeners.

5. Why do I get the error "org.eclipse.swt.SWTException: Invalid thread access"?
SWT implements a single-threaded UI model often called apartment threading. In this model, only the UI-thread can invoke UI operations. SWT strictly enforces this rule. If you try and access an SWT object from outside the UI-thread, you get the exception "org.eclipse.swt.SWTException: Invalid thread access". The following code sets the text of a label from a background thread and waits for the operation to complete: display.syncExec( new Runnable() { public void run(){ label.setText(text); } });

6 :: How to config a plugin to start automatically during platform starts up?
Define the 'Eclipse-AutoStart=true' header in Manifest file.

7 :: What is the classpath of a plug-in?
The OSGi parent class loader. (Java boot class loader by default); The exported libraries of all imported plug-ins; The declared libraries of the plug-in and all its fragments.

8 :: Do we need to explicitly invoke org.eclipse.swt.graphics.Image.dispose()?
Application code must explicitly invoke the Image.dispose() method to release the operating system resources managed by each instance when those instances are no longer required. This is because that the Java finalization is too weak to reliably support management of operating system resources.

9 :: What is Display, what is Shell?
The Display class respresents the GUI process(thread), the Shell class represents windows.

10 :: How to resize my shell to get my changed widgets to lay out again?
A layout is only performed automatically on a Composite's children when the Composite is resized, including when it is initially shown. To make a Composite lay out its children under any other circumstances, such as when children are created or disposed, its layout() method must be called.


11 :: Is there a built-in facility to check whether a given value is valid compared to the effective facets of its type?
To determine if a literal is valid with respect to a simple type, you can use either XSDSimpleTypeDefinition.isValidLiteral or XSDSimpleTypeDefinition.assess.

12 :: How can I change the window icon in my application?
Define a product via the products extension point and specify the windowImages property to refer to two image files, a 16x16 one and a 32x32 one.

13 :: What is optional dependency?
plug-in prerequisite elements can be made optional by adding the optional="true" attribute in Manifest file(see below for an example). Marking an import as optional simply states that if the specified plug-in is not found at runtime, the dependent plug-in should be left enabled. This is used when a plug-in can be used in many scenarios or it is reasonable to operate with reduced function. It allows the creation of minimal installs that cover functional subsets. Require-Bundle: org.eclipse.swt; optional="true"

14 :: What is EMF?
The Eclipse Modeling Framework is a Java/XML framework for generating tools and other applications based on simple class models. EMF helps you rapidly turn models into efficient, correct, and easily customizable Java code. It is intended to provide the benefits of formal modeling, but with a very low cost of entry. In addition to code generation, it provides the ability to save objects as XML documents for interchange with other tools and applications.

15 :: What is included in the Rich Client Platform?
Eclipse Runtime, SWt, JFace, Workbench


Monday, July 9, 2012

Eclipse RCP - How to save view layouts and state?


Introduction:

Saving the state of the application and reopening the application in the same state as previously opened vastly improves user experience. This article explains how to save the layout and state of the views in your application.

Saving Views and Layout:

First of all, you need to enable saving and restoring application state at workbench level. Make sure you override initialize method in your ApplicationWorkbenchAdvisor and add configurer.setSaveAndRestore(true);

@Override
public void initialize(final IWorkbenchConfigurer configurer) {
super.initialize(configurer);
configurer.setSaveAndRestore(true);
}

Adding this automatically saves opens views along with their layouts and makes sure they are reopened appropriately in the same layout. Isn't that amazing? Almost half of our work is done just by adding the above code block to ApplicationWorkbenchAdvisor. The remaining thing is saving the internal view state (i.e saving details of inside the view) .

Saving View State:

Let's say you have a navigator view in your perspective which displays a tree. By adding the above code block, the navigator view would be reopened in the same spot when application reopens again. But, the internals of navigator view would be lost. For example, if the tree had few selections and few nodes opened, they would be lost. Below, I'll explain how to preserve tree selections in your view.

1) Override saveState method (from ViewPart) in your view.

@Override
public void saveState(final IMemento memento) {
IStructuredSelection sel = (IStructuredSelection)this.treeViewer.getSelection();
if (sel.isEmpty()) {
return;
}
memento = memento.createChild("tree-selections");
Iterator iter = sel.iterator();
while (iter.hasNext()) {
String nodeName = iter.next();
memento.createChild("selected-nodes", nodeName);
}
}

IMemento provides way for user to store the application state in XML. User does not have to deal with XML directly and IMemento API takes care of it. When application is closed, if a view is open, it's saveState method is called before it is closed. This way, internal state of the view can be persisted before it is closed.

Restoring View State:

If you want to restore your view state (from the saved memento), you need to override the init method with memento i.e override this method

public void init(IViewSite site, IMemento memento) throws PartInitException {}

instead of

public void init(IViewSite site) throws PartInitException {}

Then, you can read the contents of the memento and restore view's internal state.

// Stores the memento so that it can be used after view is created

@Override
public void init(final IViewSite site, final IMemento memento) throws PartInitException {
init(site);
this.memento = memento;
}

@Override
public void createPartControl(Composite parent) {
// Create view here - For example, create tree viewer here

restoreState();
}

// Method which reads memento and sets selections on the tree
private void restoreState() {
IMemento selectionsMomento = this.memento.getChild("tree-selections");
if (selectionsMomento != null) {
IMemento selectedNodes[] = selectionsMomento.getChildren("selected-nodes");
if (selectedNodes.length > 0) {
ArrayList selections = new ArrayList(selectedNodes.length);
for (int i = 0; i<selectedNodes.length; i++) {
String id = selectedNodes[i].getID();
if (id != null) {
selections.add(id);
}
}

this.treeViewer.setSelection(new StructuredSelection(selections));
}
}
}

The contents of the view is created in createPartControl. Once the contents are created, it's state is set by using the restoreState method, which uses memento to get the internal state of the view last time. Above, we get selected node names from the memento and set tree selection appropriately.

Conclusion:

In this article, we saw how to preserve view layout and it's internal state so that views are reopened in exactly the same way as it was closed last time. In the next one, we'll see how to preserve editor layout and it's state.

Thursday, July 5, 2012

Remove "Convert Line Delimiters" from "File" menu


To remove "Convert Line Delimiters" or any other items from the "File" menu, use the following snippet and provide respective items'-id to "actionSetId".

Snippet:-


        @SuppressWarnings("restriction")
ActionSetRegistry reg = WorkbenchPlugin.getDefault().getActionSetRegistry();
@SuppressWarnings("restriction")
IActionSetDescriptor[] actionSets = reg.getActionSets();
// Removing convert line delimiters from File menu.
String actionSetId = "org.eclipse.ui.edit.text.actionSet.convertLineDelimitersTo";
for (int i = 0; i <actionSets.length; i++)
{
              if (!actionSets[i].getId().equals(actionSetId))
                   continue;
              IExtension ext = actionSets[i].getConfigurationElement()
                                       .getDeclaringExtension();
              reg.removeExtension(ext, new Object[] { actionSets[i] });
}

Monday, June 25, 2012

InputDialog Validation

To create a input dialog,

InputDialog fileNameDialog = new InputDialog(shell, "Rename Item", "New Name:", "", new validator());

The last parameter in the InputDialog is the object "new validator()".

class validator implements IInputValidator {
          public String isValid(String newText) {
                        if (newText==null)
return "Error Caused!";
                       }
         }

The error message is displayed while disabling the "ok" button as shown below,


Set Error Message for a TextField

To set an error message while validating a text field,
setErrorMessage("Project already exists in the workspace");
To clear the Error message,
setErrorMessage(null);